More ideas and inspiration for identifying repeated actions in your Vim workflow and automate them, and improve your productivity! A follow up to the previous article on this topic.
This is a follow-up of the Automate the Vim workplace article I published last month. As promised, here’s a follow up with more on how I identified and addressed things in Vim that could be improved to speed me up. Feel free to grab the ideas in this article or, better yet, take inspiration and inspect your workflow to identify such opportunities.
This article is part of a series:
Please note that all that I share below is what I’m using with Vim (more specifically, GVim on Windows). I don’t use Neovim (yet) and I can’t speak for any of the below for Neovim.
Easier Alternative to :
Going to the command-line mode for entering Ex commands is used very often, yet requires the hitting of Shift and ; keys. This, while there’s a giant blank key right under my thumbs that has no unique & practical purpose in the normal mode, the Space key.
noremap <Space> :
This is likely my oldest mapping that survives even today. It’s also the one I miss the most when working with Vim on servers.
Another popular alternative for this mapping is the ; key. However, unlike the
Space key, this one has a useful default functionality, which will be lost. (Look up :h
; to find out, I won’t repeat it here).
Note that we use noremap here, not nnoremap. So this works when in visual mode as well.
Repeat Key Mappings
There’s some mappings like dd, cc etc. that are made of two keys repeated sequentially. While the appear convenient, hitting them usually takes slightly longer than hitting two different keys in quick succession.
So, for all these type of bindings (and then some), I have a predictable alternative that:
" Maps that repeat a key can instead use the `.` key.
nnoremap d. dd
nnoremap y. yy
nnoremap c. cc
nnoremap g. gg
nnoremap v. V
These bindings are a lot more convenient once our fingers get used to them and we get used to the mnemonic of the . here.
Ruler vs Status Line
This is another topic that gets a lot of attention when one is setting up their Vim working environment. What with all the fancy status-line plugins in the wild, it is easy to get carried away.
My recommendation (nothing unique, has been said by better people before), is that you look at your working style first. How often do you make it a point to look at the status line while working? Now compare this to the fact that the status line costs you one line of vertical space. Measure for yourself if it’s worth it.
If your question is, but what’s the alternative? Where do I see stuff like the current line number, column number, file type, the git branch, wi-fi status of the coffee shop across the street etc. etc.? My answer is the same again, firstly, see what you need, identify what you’ll miss and narrow down to a minimal list of the stuff you need. Whatever you don’t need is most likely just a want and will end up being a distraction when you’re in deep thought (the worst kind of distraction). Secondly, we have the following other options.
One alternative is to use the ruler option. This is similar to the status line,
although not quite as flexible. But don’t let that discourage you, for minimal information to be
shown in the corner of your Vim, it’s plenty powerful. By default, it just shows the current cursor
position, but can be configured to show anything with the rulerformat option. I
won’t go into detail on how to configure them (may be in the future / others have done it better
than I could).
First, turn on ruler.
set ruler
Next, I set rulerformat as a variable since it’s slightly easier this way when dealing with escape
characters.
1
2
3
4
5
let &rulerformat = '%50(b%n %{&ff} %{&ft}' .
            \ '%( %{len(getqflist()) ? ("q" . len(getqflist())) : ""}%)' .
            \ '%( %{search("\\s$", "cnw", 0, 200) ? "∙$" : ""}%)' .
            \ '%( %{exists("b:stl_fn") ? call(b:stl_fn) : ""}%)' .
            \ '%= L%l,%c%V %P %*%)'
Each line in the above snippet is a little piece of information that I need to know at a glance. Here’s a run down:
- Buffer number,
'fileformat'(indicates line endings),'filetype'. - A count of items in the quickfix list.
- An indicator for trailing whitespace in the current buffer.
- A buffer specific function that may be called for additional input to be shown. I hardly use this currently.
- Cursor position information.
The second alternative is the titlestring. This defines what shows up in the
title bar of the window-manager’s window (not Vim window).
Using this is quite similar to using the ruler. Just turn it on and set a value to be shown. This is what I use currently:
set title
let &titlestring = '%t%( %m%r%)%( <%{get(g:, "cur_project", "")}>%)' .
            \ '%( (%{expand("%:~:.:h")})%)' .
            \ '%( (%{getcwd()})%)%( %a%) - %(%{v:servername}%)'
This contains the buffer’s name, indicators for modified and read-only, value of the global variable
cur_project (if set), path of the current buffer relative from current directory, the current
working directory itself, and finally, the servername.
Note that I use titlestring with GVim. If you want it to work when working with terminal Vim as
well, you might need to consult your terminal emulator’s (or multiplexer’s) documentation regarding
this.
Opening & Switching Buffers
This is a problem that is usually solved with one of the fuzzy finder plugins. The current most popular one appears to be a plugin based on fzf. I have used Command-T, ctrlp, LeaderF and even one that I made for myself. But then something happened on my system that broke the fuzzy-finder that I was using at the time (don’t exactly remember which). Pressed for time, I chose to use the commands that come with Vim, and haven’t bothered to investigate what broke the fuzzy finder. The following has been enough to keep me happy and productive:
" Simple mappings for buffer switching.
nnoremap <Leader>d :b *
nnoremap <Leader>l :ls<CR>

" Find/edit files
nnoremap <Leader>f :find *
nnoremap <Leader>e :edit **/*
It may not seem as powerful when you put it beside the shiny screen recordings of the fuzzy finder plugins, but it just works ™ and works perfectly fine. I took inspiration from this excellent article on the topic by romainl. Thank you!
Change CWD Smartly
This is another very old mapping that still survives. It comes in two flavors, I use cm and cu
for these. Briefly,
cm– cd to current buffer’s directory.cu– cd to the current project’s root directory.
The first one is fairly simple to implement:
" Mapping to change pwd to the directory of the current buffer.
nnoremap cm :call chdir(expand('%:p:h')) \| pwd<CR>
For the second one, it is important to understand how a project’s root identified. To me, it’s a
directory containing the .git folder. That’s not a perfect answer, but it hasn’t failed me a lot
so far. Nevertheless, my mapping below supports looking for a few other such project markers, like
.hg for mercurial VCS, .project for Eclipse projects, manage.py for Django projects etc.
There’s a few plugins that do this as well, probably better than this, but I like to do these kind of simple things myself, to have control and to have it tuned to my habits.
1
2
3
4
5
6
7
8
9
10
11
12
13
14
15
" Map to change pwd to the repo-root-directory of the current buffer.
nnoremap cu :call <SID>CdToRepoRoot()<CR>
let g:markers = split('.git .hg .svn .project .idea manage.py pom.xml')
fun s:CdToRepoRoot() abort
    for marker in g:markers
        let root = finddir(marker, expand('%:p:h') . ';')
        if !empty(root)
            let root = fnamemodify(root, ':h')
            call chdir(root)
            echo 'cd ' . root . ' (found ' . marker . ')'
            return
        endif
    endfor
    echoerr 'No repo root found.'
endfun
What’s happening here is that for each marker in g:markers, we navigate up from the current
buffer’s directory until we find a folder that has the marker. If found, we chdir to it.
Otherwise, we repeat the process for the next marker. If no marker was found, we just show an error
message. Simple & effective.
Jumping over Paragraphs
This is one of the things I wanted for a long time, but couldn’t figure out a robust solution. It’s only last year (IIRC) that I finally nailed it and this version works exactly how I want it.
The idea is that the keys <C-j> and <C-k> will jump over paragraphs, and place the cursor at the start of the first line in the paragraph. I needed the following to be true:
- After hitting either key, the cursor is positioned on the first line of a paragraph, never on a blank line.
- When in the middle of a paragraph, <C-k> moves the cursor to the first line of the current paragraph.
- Moves are not added to the jumplist.
- Cursor is placed on the first non-blank character of the paragraph. Like ^, not 0.
- They should work just fine in both normal & visual modes and the visual mode type should not change when hitting the keys.
Here’s how I’m doing this:
noremap <silent> <expr> <C-k> (line('.') - search('^\n.\+$', 'Wenb')) . 'kzv^'
noremap <silent> <expr> <C-j> (search('^\n.', 'Wen') - line('.')) . 'jzv^'
I needed to use the <expr> way of mapping keys here so as to satisfy the third and
fifth of my requirements list above.
The default mappings that come closest to this are the { and }. But they don’t satisfy my first and third requirements, and I’m very picky. I actually still use them, when they seem appropriate, but I hit the above custom mappings a lot more often.
Vertical Line Selection
This is one of my recent favorites (< 2 years old). This is the use case, usually when I went into visual block mode with <C-v>, I extend it upwards to the first line in paragraph and also downwards to the last line of the paragraph.
The following GIF might make this easier to understand:
This seems simple enough to do manually when there’s just a few lines to deal with. But when there’s >15 lines and you notice yourself doing this a dozen times a day, you need a better way.
The following mapping is my solution to this. When I hit vm, the following happens:
- Visual block selection is activated.
- Selection extends as a single column downwards until we hit a line that’s shorter than the cursor column position or we hit end of buffer.
- Selection extends in a similar fashion upwards.
The way this is implemented is that firstly we compute the number of lines to be travelled upwards and downwards from the current position. Then we construct a normal mode command which will start the visual-block mode and move the cursor so that the vertical line is selected. For example, in the GIF above, our function would construct the normal mode command \<C-v>2jo1k. This works quite well and doesn’t affect the jumplist.
1
2
3
4
5
6
7
8
9
10
11
12
13
14
15
16
17
18
19
nnoremap <expr> vm <SID>VisualVLine()
fun! s:VisualVLine() abort
    let [_, lnum, col; _] = getcurpos()
    let line = getline('.')
    let col += strdisplaywidth(line) - strwidth(line)

    let [from, to] = [lnum, lnum]
    while strdisplaywidth(getline(from - 1)) >= col
        let from -= 1
    endwhile

    while strdisplaywidth(getline(to + 1)) >= col
        let to += 1
    endwhile

    return "\<C-v>" .
                \ (to == lnum ? '' : (to - lnum . 'jo')) .
                \ (from == lnum ? '' : (lnum - from . 'k'))
endfun
Zoom When Presenting
Occasionally (read: more often than I like to admit), I end up having to present some code to a small audience with is slightly larger than my immediate team. Additionally, I also note down the proceedings of meetings in Vim and present them on screen sharing to get inputs and corrections, essentially steering the meeting.
On such occasions, I need to increase the font size so it’s visible to everyone in the audience / meeting. When presenting, I’ve heard complaints from people sitting a bit far back, and when sharing my screen, I’ve heard complaints from people connecting from their mobile devices (!).
The following two mappings are born out of this need.
1
2
3
4
5
6
7
8
9
10
11
12
" Increase / Decrease font size.
let g:font_size_pat = s:iswin ? ':h\zs\d\+' : '\d\+'
nnoremap <silent> z+ :<C-u>let &guifont = substitute(
            \ &guifont, g:font_size_pat,
            \ '\=eval(submatch(0) + ' . v:count1 . ')', '')
            \ \|simalt ~x<CR>
nnoremap <silent> z- :<C-u>let &guifont = substitute(
            \ &guifont, g:font_size_pat,
            \ '\=eval(submatch(0) - ' . v:count1 . ')', '')
            \ \|simalt ~x<CR>
nmap z<kPlus> z+
nmap z<kMinus> z-
This snippet defines two mappings in normal mode, z+ and z-, that work with the keypad as well (which is what the last two lines are for).
This works by calling substitute on the guifont option with a pattern tailored for how the font
size is specified on the current platform. The replacement for this pattern contains a
sub-replace-expression that spits out the new font size number.
However, there was a quirk. Once the font size is changed, the Vim window is restored (not maximized
anymore). This was annoying to me since I almost always keep my Vim maximized (especially when
presenting). So, the following simalt ~x will maximize the window again.
Another small additional feature in these mappings is that they accept a count. For example, hitting z+ will increase the font size by 1 point, hitting 3z+ will increase it by 3 points.
Copy Lines as CSV
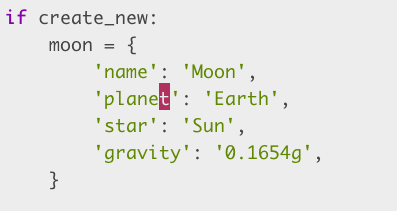
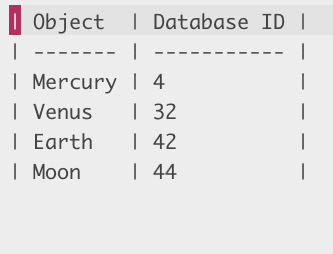
I write my notes, both work and study in Vim, as plain text, loosely Markdown (I’ll write about that in a future article). Among these notes, there’s occasionally lists of domain specific stuff for the applications or projects I’m working with. I usually need these as reference for objects that I often look up in databases. For example, I have a note like the following:
| Object  | Database ID |
| ------- | ----------- |
| Mercury | 4           |
| Venus   | 32          |
| Earth   | 42          |
| Moon    | 44          |
From this I want do a visual-block selection of all the ID numbers and paste it into an SQL SELECT
query that looks something like:
SELECT * FROM celestial_objects WHERE id IN (4, 32, 42, 44);
Essentially, what I needed was to copy the visually selected lines as a comma separated string. It might seem an overkill solution for the example I’m demonstrating here, but when there’s ID numbers in the millions and Markdown tables with over a dozen rows as reference in my notes, it quickly adds up to being extremely annoying.
So, I came up with the following:
" Copy selected lines as CSV
xnoremap <silent> <Leader>y :<C-u>call <SID>CopyLinesAsCSV()<CR>
fun s:CopyLinesAsCSV() abort
    let [_, l1, c1, _] = getpos("'<")
    let [_, l2, c2, _] = getpos("'>")
    let lines = map(getline(l1, l2), {i, l -> trim(l[c1-1:c2-1])})
    call setreg(v:register, join(lines, ', '), 'l')
endfun
This defines a mapping in visual mode, <Leader>y (which can take a register, just
like the default y) that takes the selected lines (or selected block), joins them with
', ' and puts that in the register.
Here’s a preview of this in action:
This combined with the vm explained in a previous section, it’s really quick to take a column of values as a comma separated string.
Conclusion
This is a continuous process of identifying and honing the habits at work. Considering how programmable Vim can be when it comes to editing text, it’s both fun and productive to introspect. Although I won’t discourage you from it, I recommend not to just blindly copy everything here into your own vimrc. Take only if you need, take only what you need, and do take everything you need.
I plan to write the next chapter in this series next month, so stay tuned and remember to check back.
Identify, optimize, repeat.
Read the previous article, or the next article in this series.
